


Installation
What is RANCHecker?
RANCHecker is a 3ds Max plugin developed by Ranch Computing that prepares your project for upload to the RANCH render farm.
What does it do?
RANCHecker automates the preparation process by:
- Compiling everything into a
.VU3 archive file, ready for upload to the RANCH.
- Collecting all textures used in your scene.
- Including assets and Global Illumination (GI) maps (if applicable).
- Verifying that rendering parameters are correctly configured.
- Adjusting file paths as needed.
How to use it?
- Launch the plugin and load your scene in 3ds Max.
- Click ‘Prepare Project’ to package your project for the RANCH.
- Click ‘Upload Project to RANCH’ to submit it for rendering.
That’s it! Your project is now ready for rendering on the RANCH Renderfarm!
How to install RANCHecker?
- Download the RANCHecker plugin for 3ds Max and extract the ZIP file to your hard drive.
- In 3ds Max, install the plugin using one of these methods:
- Via Script Menu:
- Go to Scripting > MAXScript > Run Script.
- Browse and select the
.mzp file (not the ZIP).
- Drag & Drop:
- Simply drag the
.mzp file directly into the 3ds Max viewport.
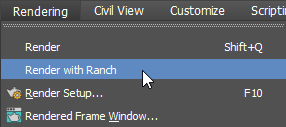
RANCHecker is accessible via the ‘Rendering’ menu:

You can also create a button in the 3ds Max toolbar as a way to launch RANCHecker quickly. To do this you have to:
- Go to Customize→Customize User Interface
- Go to the Toolbar tab, Category: ‘RANCHecker’,
- Drag the ‘RANCHecker’ name to the toolbar.

What is RANCHecker?
RANCHecker is a 3ds Max plugin developed by Ranch Computing that prepares your project for upload to the RANCH render farm.
What does it do?
RANCHecker automates the preparation process by:
- Compiling everything into a
.VU3archive file, ready for upload to the RANCH. - Collecting all textures used in your scene.
- Including assets and Global Illumination (GI) maps (if applicable).
- Verifying that rendering parameters are correctly configured.
- Adjusting file paths as needed.
How to use it?
- Launch the plugin and load your scene in 3ds Max.
- Click ‘Prepare Project’ to package your project for the RANCH.
- Click ‘Upload Project to RANCH’ to submit it for rendering.
That’s it! Your project is now ready for rendering on the RANCH Renderfarm!
How to install RANCHecker?
- Download the RANCHecker plugin for 3ds Max and extract the ZIP file to your hard drive.
- In 3ds Max, install the plugin using one of these methods:
- Via Script Menu:
- Go to Scripting > MAXScript > Run Script.
- Browse and select the
.mzpfile (not the ZIP).
- Drag & Drop:
- Simply drag the
.mzpfile directly into the 3ds Max viewport.
- Simply drag the
- Via Script Menu:
RANCHecker is accessible via the ‘Rendering’ menu:
You can also create a button in the 3ds Max toolbar as a way to launch RANCHecker quickly. To do this you have to:
- Go to Customize→Customize User Interface
- Go to the Toolbar tab, Category: ‘RANCHecker’,
- Drag the ‘RANCHecker’ name to the toolbar.
